Are you familiar with those cute new commercials by Ragù about the Long Days of Childhood? Personally they just crack me up! My husband and I always joke around when watching our kids from time to time, how incredibly difficult it must be to be a 2 and a 5 year old these days. Lol! These commercials capture just that. So I love when I catch a new one on television- can totally relate. Well they have now taken it a step further and have developed a new app called the 'Give 'Em Ragu' app. You get to upload photographs and videos of your own children and then the app will put them to music to describe their very own "Long Day of Childhood". How cool is that? What kid doesn't like to see their face on video, let along a music video?! After creating your video you can then share it with all of your friends and family; it can even upload right onto Facebook!
When I heard about this app I was thrilled to play around with it to create one for my boys. A nice feature I found was that you can use pictures from Facebook, Instagram or your computer, giving you tons of options. It was really fun to play around with, adding silly pictures and then watching the looks on the faces and hearing the giggles from my two boys. The app itself couldn't be any easier, you select up to seven pictures, rearrange them, write a little snippet describing your photo story and that's it! Hit send and Ragù pits together your own little commercial featuring your kids with a song and a story to match. They really are quite funny.
Go on, try it yourself! They have it available on iTunes, Android and Facebook, making it possible for everyone to have fun.
iPhone: Go to iTunes and search for Give'Em Ragu
Google Play: search Give 'Em Ragu
Facebook: http://www.facebook.com/ragusauce/app_185445561580086
This is my most favorite of the Long Days of Childhood Commercials: The Sleepover
Pros: this was a fun app and a great way to share memories of you family in a fun new way. Plus it is super easy to do!
Cons: I had issues with the app for my itouch and it kept shutting down before I could save it. I am hoping to share my own movie with you all later if i can get the kink ironed out. Other goofy thing is that it was hard to get the image focused and centered on my sons face. It did some odd cut outs and edits, but hey, it is a free app! I can live with it. I still think it is a worth playing around with. I had a lot of fun with it!
*Disclaimer – I was compensated for my review of this app, but all thoughts and opinions are my own.
Wednesday, December 12, 2012
Long Days of Childhood app by Ragù
Wednesday, October 31, 2012
The Guide to Trading Candy- A Fun Must See!!!

Monday, October 29, 2012
Rosie The Riveter says "My Retro Kitchen Can Do It!"

What are you all being for Halloween on Wednesday? This year I had an opportunity to go up to the islands for an Adult Only Halloween party. It forced me to get a bit creative with a costume, oh so much fun! I don't remember the last time I got to do this (pre-kids, maybe even pre-marriage!!). And the best part- now I get to wear my costume twice! We are talking a lot about the roll of the woman in my Bible Class this year and it got me thinking..... and Rosie the Riveter was born.
It is never a good time for a hurricane- but the forecast for Halloween here in Ohio is 100% rain. I am so disappointed for the kids. They look forward to this all year. To make the best of it all, I think our plan will be to hit as many of houses for Trick or Treating, umbrella in hand, and then head back to the house for a full-blown Halloween Party. Time to put the thinking caps on (and search Pinterest of course!!) for some games and other goodies for the night. Do you need to change your plans much this year too? Please let me know in the Comments Section how you are planing on spending the evening this year and of course your costumes- and even better, head over to my facebook page and share your pictures and ideas with me!!
I am in charge of dessert for the party. There are SO many ideas swirling in my head! I will share the final finished product and lots more pictures of course, so please check back!
Halloween hugs and kisses,
Rosie the Rivetor
aka "Amie"
Tuesday, October 23, 2012
Fall Harvest Recipe Round-Up!


Kolokithopita- Savory Greek Pumpkin Pie
Low Carb Spiced Pumpkin Bread
Yum Yum Brownie Muffins
Caramelized Onion Pumpkin and Ricotta Tortellini's with a Walnut and Sage Brown Butter Sauce

Apple Cream Cheese Quick Bread
Apple Dapple Cake
Traditional Apple Crisp
Apple Muffins with Cinnamon Sugar

Thursday, October 18, 2012
"Like" to End Cancer!!

October 6th was such a fun and easy way to take part in a fundraiser that truly means a lot to me as a woman. Not only did I go out and drive a fancy new car (that looks and drives nothing like my mini van! LOL) But just for test driving $10 was donated by Chevy to the American Cancer Society! It was that easy! I also received that pretty pink pashmina you see me wearing in the picture. Oh my goodness, it was SO super, duper windy that day so I kinda look like I am being swallowed by it, but I honestly do love it! It is very soft and cozy.
Maybe you didn't get an opportunity to go out and take the test drive, Sunday's are busy for a lot of people, but you still really would love to help some how. Well guess what?! Chevy is running a second fundraiser that is even easier and faster then the last!
Yep, you read it right!!
First you help by clicking "Like" on their page and then you help again by sharing their page to all of your friends and family. Say you have 200 friends in your facebook account and each one clicked, that is $201 YOU just had a had in raising while sitting on your couch! And then if they all shared the page and so on... you get the idea. How cool is that!? So much can be done by honestly doing so little. Makes it silly not to help, huh?
I will help you out a step further.... Here is a possible facebook post to share the word. just copy and past! Easy-peasy!
SHARE FOR THE CURE!Your Chevy Network Dealers are committed to fighting breast cancer! Share this page with your friends and for every new "Like" $1 will be contributed to the American Cancer Society Making Strides Against Breast Cancer initiative. https://www.facebook.com/gottalovechevyneo/app_530481036969146Wait, there's more! Not only can you help to raise money for the cure, 3 fans will be entered into a FAN-tastic makeover complete with hair, makeup, lunch and a personal shopping experience. Plus the winners of the FAN-tastic Chevy Girl Makeovers will be featured on Fox 8 New Day Cleveland!! So there is something for you too. It is a win-win.
Thank you friends!

{Disclosure: I am being compensated to help Chevy promote their initiative to raise money for Making Strides Against Breast Cancer. All opinions are 100% my own.}
Foodie Pen Pal Reveal & recipe for Butternut Squash Casserole

While stumbling along a blog last month, The Lean Green Bean, I discovered this awesome program she created called the Foodie Pen Pal. You add your name to her list and she will randomly match you up with another Foodie (either a blogger or blog reader). You then fill your box full of fun goodies, local treats or even homemade items and send them to your Pen Pal. Oh how fun this was, and such a great idea!! I am posting this pen pal reveal late, due to some personal circumstances. But I just HAD to share- better late then never, right?!!
Autumn, from Texas was matched with me and I was to send to a girl in Louisiana. I don't know about everyone else in the pen pal program, but I got a feast from mine!! Autumn out did herself.

- ThinkThin Caramel Chocolate Dipped Mixed Nuts bar
- ThinkThin Cranberry Apple and Mixed Nuts bar,
- her favorite Cookie Dough flavored Luna Protein Bar (perfect after a long hike she says- although I can attest they are also perfect after chasing around a toddler and a 5 year old! LOL!)
- I also got three sampled sized Justin's Almond Butters with the flavors of honey, classic and chocolate,
- A box of Sea Salt Almond Thins (and yes Autumn, they are dangerously addictive!!)
- a bottle of CoCo Libre,
- a pack of Simply Organic Sweet Basil Pesto Sauce and also a pack of the Spicy Chili Seasoning,
- a travel-sized Snackimals in chocolate chip flavor
- and then Mrs. Leeper's Corn Spaghetti which was voted #1 Spaghetti Brand in her hometown of Tyler. And last but not least she included a package of Organic Coconut Flakes.

Tuesday, October 16, 2012
Cinnamon Raisin Bread (Bread Machine)

Bread Machines are so perfect for those "I am in the mood for Cinnamon Raisin Bread moods" but you have loads of laundry to do, kids to play with, bed linens changed and a million and one other items on your To-Do List making it impossible to devote the time to baking. Very much like a crock pots, you add the ingredients, turn it on and walk away! 3 hours later you have homemade bread! I love mine and use it all the time- I am all about making my life easier from time to time! If you don't have one, you can usually find them at garage sales and Salvation Army's for cheap. Or you can do like I did and ask around and see if anyone has one sitting around unused taking up space they want to free up! (They have no idea what they are missing out on!!) Here is a terrific recipe for Cinnamon Raisin Bread. It doesn't have a "swirl" of cinnamon, but instead the cinnamon is infused throughout the entire loaf. It is yummy and makes the house smell amazing.

Cinnamon Raisin Bread (Bread Machine)
1 egg + water to equal 1 1/4 cups
2 Tablespoons powdered milk
1 1/4 teaspoon salt
2 Tablespoons brown sugar
2 Tablespoons butter
3 2/3 Cups All Purpose white flour
1 teaspoon cinnamon
1 1/4 teaspoons yeast
add ingredients:
1/2 cup Raisins (although I added 1 cup! I like a lot of raisins in mine!)
1. Measure first 8 ingredients in the order listed into Baking Pan
2. Insert Baking Pan into oven chamber, twist to secure and close lid
3. Select: Sweet Bread Setting
4. Select "Regular" or "Dark" crust (I always choose the "regular" crust, I find the "dark" way too dark for my taste)
5. Press Start- there will be a 15 minute preheat delay before mixing begins
6. Add raisins when the "Add Ingredient" signal beeps
7. Using oven mits, remove bread when completion beep sounds.
8. Cool on a wire rack before slicing
Baking time: 3:50 hours and Makes a 2.0 lb loaf

Saturday, October 13, 2012
Crock Pot Round-Up!
The sweaters are on and the boots are out; movie time surrounded in tents of afghans and extra pillows, it is autumn and the first thing I think of is COZY! It is just plain chilly out there so being able to come home to warm house that surrounds you in delicious smells is a wonderful thing! Crock pots are easy, almost effortless, yet when done right, gives you a multitude of fantastic and different meals that can taste like you slaved all day to make them. Here are some of my favorites!

Easy Chili
Candy's Chicken Tortilla Soup

Thai Style Peanut Pulled Chicken in the slow cooker served with an Asian Slaw
Dr. Pepper Pulled Pork in the Slow Cooker
Mustard and Vinegar Pulled Chicken Sandwiches

Chicken and Sun-Dried Tomatoes
Beef Roast with Tomato Ragout (Slow Cooker)
Texas BBQ Pot Roast (not pictured)
Here's to the season for Slow Cooking!! Now go out, make a few, and spend more time with your families!
Thursday, October 11, 2012
Chicken and Sun-Dried Tomatoes

Chicken and Sun-Dried Tomatoes
3 lbs chicken, boneless, skinless breasts or thighs
1 medium onion, chopped
2 garlic cloves, minced
2 cups chicken stock
1 teaspoon dried basil
1/2 cup sun-dried tomatoes, cut into slivers
Don't forget to spray the inside of your slow cooker with non-stick cooking spray for easier clean-up!
Place the chicken in the bottom of the slow cooker. Add the onion, garlic, chicken stock, and basil. Scatter sun-dried tomatoes over top and cover. Cook for 4-6 hours on LOW or 2-3 on HIGH. Serve over noodles or rice.

Wednesday, October 10, 2012
Look Who Is Featured on [the nest]!!
Seven years ago I got to know a website called The Knot really well. They know weddings better then anyone, and no one that is anyone plans a wedding without surfing their website or reading their books and magazines. Once you are hitched you get to move onto the next phase in life, and they have a web-home for that too- [the nest]! It is a fun place for all of your home advice, buying, decorating, and cooking within needs. I love it! So how excited was I to see they featured my Roasted Pumpkin Seeds?!! It's awesome! Thank you [the nest]! I like you too. Go take a look, I bet you will like this site as much as I do. Have fun!
If you happen to go to the front page of their blog, my pumpkin seeds even make an appearance in their Top Stories Picture box! Yippee!
My recipe for the Roasted Pumpkin Seeds- Two Ways, Savory and Sweet can be found Here.

Sunday, October 7, 2012
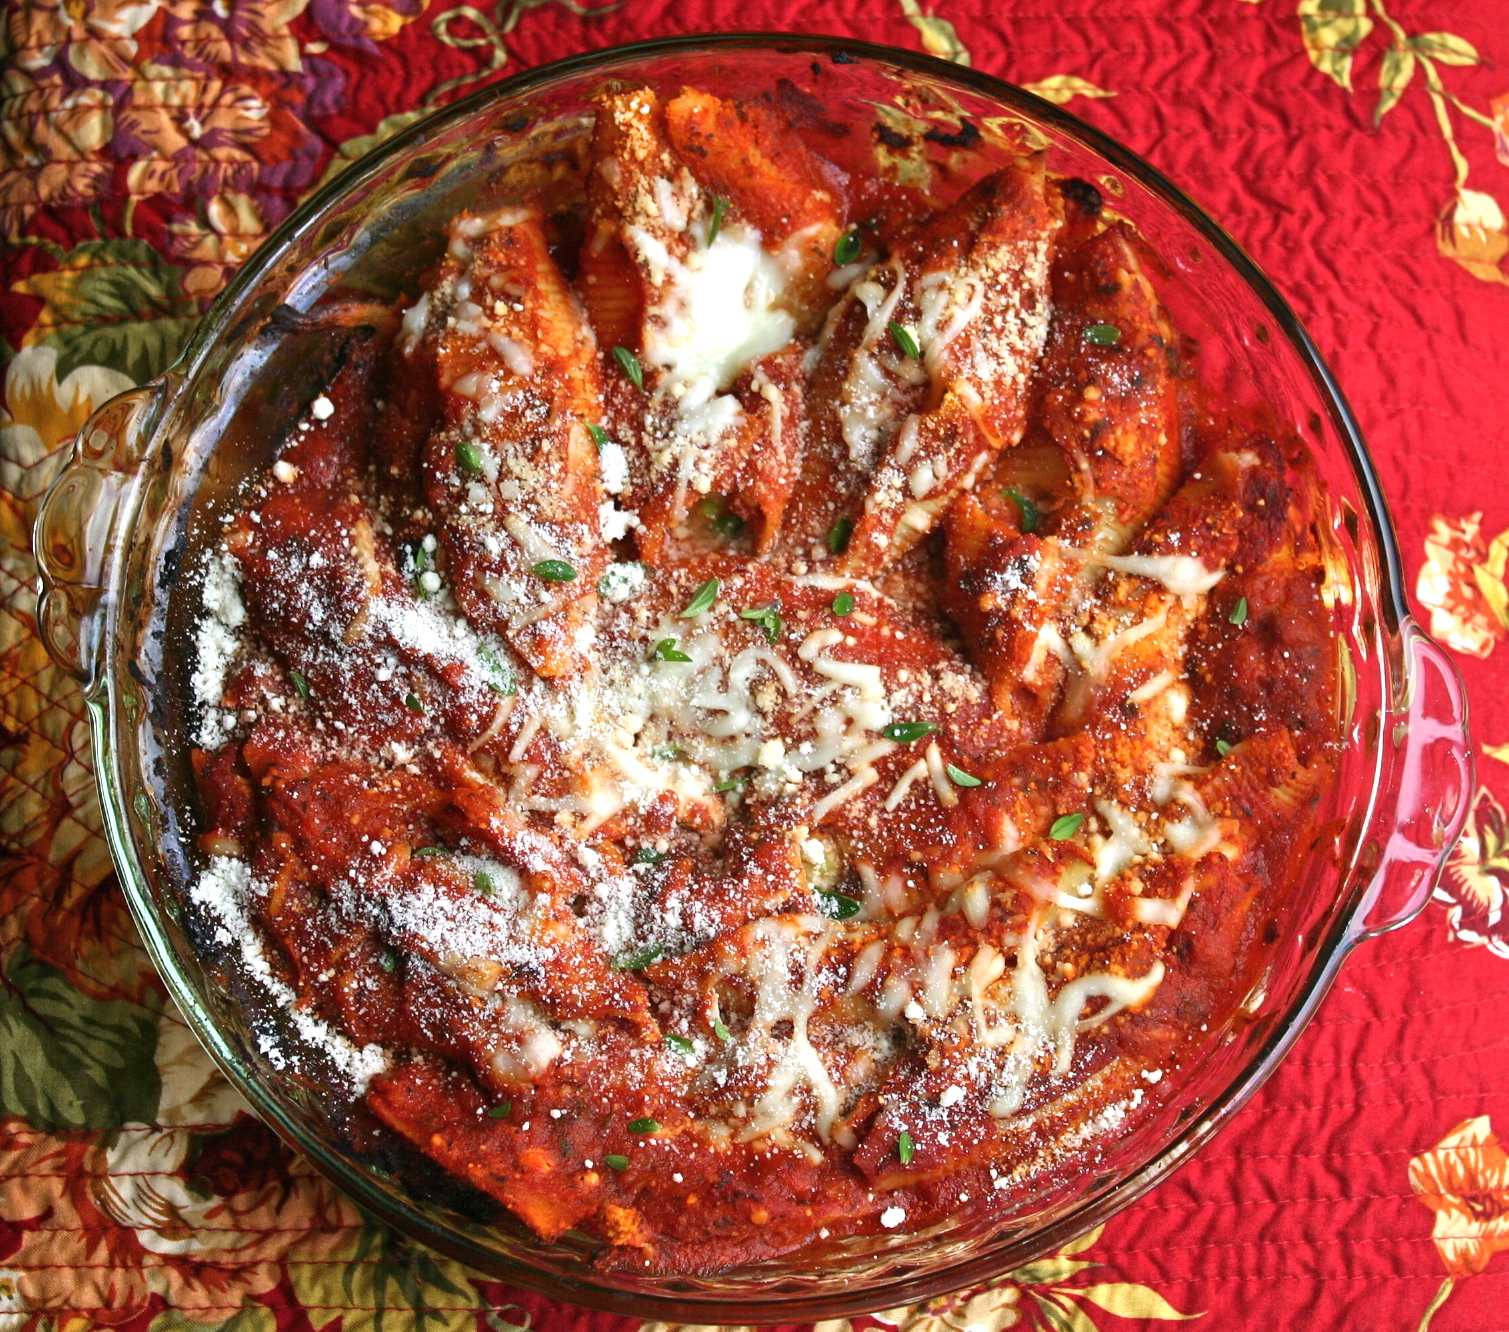
Three Cheese Stuffed Shells

For the Cheese Filling
1 1/2 cups ricotta or cottage cheese
1 1/4 cups grated Parmesan, Asiago, or fotinella cheese
1 generous cup shredded mozzarella cheese
1/4 medium onion, finely chopped
6 scallions, finely chopped
1/4 cup tightly packed fresh oregano leaves, finely chopped
1/4 cup tightly packed fresh basil leaves, finely chopped (optional)
1 clove garlic, minced
salt and fresh ground black pepper to taste
1 large egg, lightly beaten
Stir together everything but the egg in a large bowl. Taste and adjust the seasonings, then add the egg. Combine well and set aside.
For the Pasta Shells
8 oz, Jumbo Pasta Shell Noodles, cooked al dente and cooled enough to handle
1 jar spaghetti sauce
1 cup shredded mozzarella cheese
Preheat oven to 400 degrees F.
Cook pasta shells for about half of the cooking time, to very al dente, being careful not to overcook. Rinse in cold water and set aside. Spread 1/3 of the spaghetti sauce on the bottom of a baking dish.
Fill each shells with 2 Tablespoons of cheese filling and place on top of the sauced dish. Repeat filling the shells until all of the mixture is gone. Top shells with the rest of the sauce and sprinkle with mozzarella cheese. Bake for 20-25 minutes or until hot and cheese is melty.
Serve with nice crusty bread and a crisp salad.


*cheese filling adapted from The Joy of Cooking
Wednesday, October 3, 2012
Making Strides Against Breast Cancer
October is Breast Cancer Awareness Month. Being a woman, the thought and fear of Breast Cancer is one that I will unfortunately live with forever. It is a scary disease that all together too many woman have to deal with every single day of their lives. It shouldn't be this way! But until a cure is found we need to keep pushing to do our part to be a part of the cure. Because of great initiatives, tons of awareness is coming to the forefront of how we can help raise the money needed to find the cure. There are so many wonderful ways; we can keep buying pretty pink things, spend a day (or 3!) walking with friends, and donate directly to the ACS.
Here is a whole new way! I hope you have all noticed that pretty pink banner that runs down the right hand side of the blog here. I am so excited about it- let me tell you a little about this! I was approached by the Chevy Network Dealers to work along side of their team promoting an amazing initiative they have started, Making Strides Against Breast Cancer. Aside from it being an important, amazing cause, there is also absolutely nothing bad in this arrangement!! You get to go out and test drive a fun new car, receive a pretty, pink pashmina and Chevy will donate $10 to the American Cancer Society all for you doing it! There was no way I was going to say no to this! Mark Oct. 6th on your calendars now!
My father retired after having worked for Chevy for 30+ years and we have all driven and trusted their cars for, well forever. I am very exited and oh so proud that this company is also contributing in such a huge way to Breast Cancer Research. Thank you Chevy!

Join your Chevy Network Dealers in the fight to end breast cancer. For every test drive on October 6th, Chevy will contribute $10 to the American Cancer Society Making Strides Against Breast Cancer initiative, up to $130,000, and you’ll receive a beautiful pink pashmina.

All of the participating dealerships are listed here!
Continue to do your part by following the #drive2endcancer hashtag on Twitter and by “liking” Gotta Love Chevy NEO on Facebook. Social media rocks.
This is a sponsored post care of the Chevy Network Dealers. My thoughts and opinions are my own.
Simple Cheese Filling

Simple Cheese Filling
Recipe courtesy The Joy of Cooking
1 1/2 cups ricotta or cottage cheese
1 1/4 cups grated Parmesan, Asiago, or fotinella cheese
1 generous cup shredded mozzarella cheese
1/4 medium onion, finely chopped
6 scallions, finely chopped
1/4 cup tightly packed fresh oregano leaves, finely chopped
1/4 cup tightly packed fresh basil leaves, finely chopped (optional)
1 clove garlic, minced
salt and fresh ground black pepper to taste
1 large egg, lightly beaten
Stir together everything but the egg in a large bowl. Taste and adjust the seasonings, then add the egg.
Use this filling in any variety of filled and stuffed pastas. I love it for my Stuffed Shells! But don't stop there. It is also a wonderful filling for vegetables like tomatoes, zucchini mushrooms and peppers.
Store covered in the refrigerator for up to 24 hours.
Tuesday, October 2, 2012
A "New Day" for me
"Our truest life is when we are in our dreams awake" ~ Henry David Thoreau

"It takes a lot of courage to show your dreams to someone else." ~Erma Bombeck
"The indispensable first step to getting the things you want out of life is this: decide what you want." ~Ben Stein
Be brave. Take risks. Nothing can substitute experience. ~Paulo Coelho


Monday, October 1, 2012
Broccoli Cheese Soup

Happy 1st day of October! Autumn is officially here, and I welcome it with open arms! Time to bust out the afghans, cozy sweatshirts and sweaters, and snuggle with those you love. And it is also the time to warm your insides with a nice warm bowl of soup. This broccoli Cheese soup will do just that. The Tobasco Sauce in the soup is just used for flavor, not for heat. If you want it spicy, I like serving the bottle on the side so others can add as they like. This soup screams for crusty bread so don't forget it!
Broccoli Cheese Soup
1/2 stick of butter
1 medium onion, chopped
1 cup carrots, cut into matchsticks
1/4 cup flour
2 cups broccoli, chopped
1 cup half and half or whole milk
1 cup chicken stock
2 cups cheddar cheese, shredded
salt and fresh ground black pepper to taste
Tobasco Sauce, a few dashes to taste (I used about 12)
Melt the butter in a large stock pot over medium-high heat add the onion and carrots and cook until tender, about 5 minutes. Add the flour and allow to cook until absorbed, about 2 minutes more.
Slowly stir the half-and-half and chicken stock into the mixture, about 1/4 cup at a time allowing the mixture to thicken before adding more. Once all the liquid is added,
stir in the broccoli and cheddar cheese. Season with salt and pepper.
Reduce heat to medium-low. Stirring occasionally, allow the soup to simmer until the the cheese has melted completely, about 10 minutes. Add up to an additional 1 cup of water or chicken stock to reach your desired soup thickness.
If you like a thicker soup, remove 1/2 from pot, and puree with an immersion blender. Once smooth return to pot and stir to combine.
Ladle into soup bowls and garnish with a sprinkle of cheddar cheese for a garnish. Serve with nice crusty bread to sop up every last bit of the soup!

Friday, September 28, 2012
Wanna watch me on New Day Cleveland?!
Hello friends! The lovely people of New Day Cleveland uploaded yesterday's appearance onto Youtube for all of those that missed it Live! And you know what- this is the first time I can actually watch myself without cringing. I just may be getting used to this Live thing. :) I can't chat long, I have little boys that need to run around outside and burn some energy! But I will be back to fill you in on all the fun-ness of yesterday! Thanks again for all your awesome support! xoxo
Thursday, September 27, 2012
Udon Noodle Salad with a Spicy Peanut Vinaigrette

3's a Charm! Today I am making my third guest appearance on the television show New Day Cleveland! I don't think I could ever get tired of this much fun! This morning they asked me to share a recipe that is great for getting back into the school mode. Right away I thought of my Udon Peanut Noodles. It is something simple to prepare with all of the new schedules us as parents are trying to juggle, but also great for the learning minds! This recipe is on a very regular rotation in our home. I could probably eat this on a weekly basis, no joke! We LOVE it!
This is a chilled pasta dish, easily working perfect packed in the lunch boxes giving a nice change up to the sandwich they normally might carry. The sauce is made with peanut butter, which kids seem to get a kick out of! But the recipe is also chock full of vegetables and lean protein that makes us more then happy to serve it to them! It is a meal I can feel good about giving and also enjoy eating myself!
There is a slight spice but nothing that my own children feel is too hot. But please feel free to adjust to your families preferences!
There is a similar recipe I have already shared with you, but this one I did some tweaking and love it even better. I made the sauce lighter, more vibrant and better for a cold dish. I hope you all love it as much as we do!

Udon Noodle Salad with a Spicy Peanut Vinaigrette
For the Noodles:
1 Package Thick Udon Noodles, cooked according to package directions, then chilled (spaghetti or linguine would also work just fine)
The meat from one prepared rotisserie chicken, chopped
2 Cups carrots, julienned (I bought the bag in the produce aisle all prepped for me already)
2 Cups english cucumber, julienned
2 Cups cabbage, shredded (again, I used the coleslaw bag in the produce department)
4 green onions sliced, white and green parts
2 Cups Sugar Snap Peas
2 Cups bean sprouts
2 Tbsp Sesame Seeds, toasted
3/4 Cup shelled peanuts, chopped
Spicy Peanut Vinaigrette
Makes 1 cup
1/4 cup chicken broth
1/4 cup rice vinegar
1/4 cup canola oil
4 Tablespoons creamy peanut butter
2 Tablespoons soy sauce
1 Tablespoon fresh ginger, grated (or 1 tsp. dry ground)
1 teaspoon sesame oil
1 teaspoon red pepper flakes
Add all the ingredients in a medium bowl. Using a hand blender (or stand up blender), mix everything until smooth, about 30 seconds.
You may also use a hand whisk to make the vinaigrette, although the blender makes quicker work of it! If you do not own a blender, microwave peanut butter for 15 seconds, softening to make mixing easier. Add to remaining vinaigrette ingredients. Whisk everything until fully incorporated and beginning to froth. Set aside.
In a large pot of lightly salted boiling water, cook the udon noodles for about 5-7 minutes or until tender. Drain and rinse the noodles under cold running water. Set aside.
Using a DRY large frying pan, heat the sesame seeds on Medium heat, shaking the pan occasionally. Remove from pan when they begin to turn a light brown and become fragrant (about 3-5 minutes). Do not allow to burn!
Combine the cooked noodles, chicken, cucumber, sprouts, carrot, green onions, sugar snap peas, peanuts and toasted sesame seeds, reserving some of the veggies and sesame seeds and peanuts for garnish. Pour the Spicy Peanut Vinaigrette over the salad. Toss until well coated.
Serve chilled, garnished with the reserved veggies, peanuts and sesame seeds. Don't forget to have Sriracha on the side for those who like to add a little extra heat! Yum!

Wednesday, September 26, 2012
Very Good News!

Please cheer me on and pray that all goes smoothly, or at least that I am good at laughing at myself afterwards ;) How does one ever get used to Live television?!!
Either way I can, without a doubt, say that these experiences are a few of My Favorite Things..... Along with brown paper packages tied up with string, cream colored ponies and crisp apple strudel!
By the way did I ever mention that I was born a Trapp? I always hoped and dreamed that I was one of the real VonTrapp's back in the day... so I just couldn't help myself referencing The Sound of Music tonight. One of the best movies Ever Made. I also always hoped I could sing like Julie Andrews, but that is another post for another day..... Hahaha.
So please join me Live or set your DVR's for tomorrow, September 27, bright and early on Fox 8 at 10:00am on New Day Cleveland! See you then!
Tuesday, September 25, 2012
Buffalo Chicken Soup

Hot Wings. Just thinking the word makes my juices start and there you go- Forget it. I have a full blown taste for those delicious little guys that won't be satisfied until I have about a dozen in my belly! They are one of my favorite foods ever! Who doesn't love wings? That spicy, addicting flavor is always a hit at parties. And with Football Season upon us what a perfect time to add a new recipe to your Party Cookbook?! It tastes exactly like Buffalo Chicken Wings only it is way less messy *grin*. I can guarantee that this soup will be gobbled up in seconds flat, so I highly recommend making a double batch! It is that good. You will be the Hit of the party for sure! If you are making it for dinner I suggest serving it alongside a garden salad topped with Blue Cheese or Ranch style salad dressing.
When making the soup, start with only a 1/4 of a cup of Franks Hot Sauce, and then go up from there. If you aren't into spice, but love the flavor, a 1/4 of a cup will be perfect for you. But if you like heat and spice like we do then 1/2 cup is a great amount. You can always put the bottle on the table and people can add more to suit their own personal taste. Don't forget, it is always easier to add more!

Buffalo Chicken Soup
recipe adapted from allrecipes
1/4 cup butter (1 stick)
3 celery stalks, chopped
1 medium onion, chopped
1/4 cup flour
3/4 cup half and half or whole milk
3 cups chicken stock
2-3 large chicken breasts, cooked and shredded (or 2- 12.5 oz. cans of chicken)
1/4-1/2 Cup Franks Hot Sauce, depending on spice preference
2 cups cheddar cheese, shredded
salt and fresh ground black pepper to taste
blue cheese crumbles and fresh flat leaf parsley for garnish
Melt the butter in a large stock pot over medium-high heat and the celery and onion and cook until tender, about 5 minutes. Add the flour and allow to cook until absorbed, about 2 minutes more.
Slowly stir the half-and-half and chicken stock into the mixture, about 1/4 cup at a time allowing the mixture to thicken before adding more. Once all the liquid is added,
stir in the chicken, Franks Hot Sauce, and Cheddar cheese. Season with salt and pepper.
Reduce heat to medium-low. Stirring occasionally, allow the soup to simmer until the the cheese has melted completely, about 10 minutes. Add up to an additional 1 cup of water or chicken stock to reach your desired soup thickness.
Ladle into soup bowls and garnish with crumbles of blue cheese and fresh flat leaf parsley. Serve with a garden salad topped with Blue Cheese or Ranch Style dressing.

Wednesday, August 29, 2012
Zucchini Bread

When overloaded with zucchini, what's a person to do- bake zucchini bread of course!!
If you haven't noticed already from here, we are huge fans of quick breads. First of all, well, they are quick! You get an almost instant gratification- stir a bunch of ingredients in a bowl, dump into pans, bake, cool and eat. No special equipment required and they are perfect for little helpers in the kitchen because they can almost do the entire thing themselves!
This recipe is one I borrowed from my Mother-in-law, Judy. Every summer along with an armful of ripped zucchini's she also brings over a wonderful loaf of this delicious bread. It never lasts long in our house! It is so, so good! It is lightly sweetened and studded with lots of raisins which is how we love bread in our house. We aren't big nut-in-bakery people in our house. But of course you can go either way. This year I asked if I could share the recipe with all of you, and you lucky people- She said yes! Thank you Judy!

Zucchini Bread
3 cups All Purpose Flour
3 eggs
2 cups sugar
1 cup vegetable oil
1 teaspoon vanilla
2 cups grated zucchini
1 teaspoon cinnamon
1 cup nuts or raisins (optional)
1 teaspoon salt
1 teaspoon baking soda
1/4 teaspoon baking powder
1/2 cup sour cream
Preheat oven to 350 degrees F.
Grease and flour just the bottom of two loaf pans.
Sift flour into a large bowl and add all dry ingredients and set aside. In a medium sized bowl cream eggs and sugar and then add all of the wet ingredients. Add the wet ingredients to the dry and mix together well. Pour into the two prepared loaf pans.
Bake 1 hour and some minutes, (at least an hour, but the minutes will depend on your oven. Judy's cooks in exactly 1 hour while her sister's oven takes a bit longer) or until a toothpick comes out clean. Keep an eye on it.
Cool in loaf pans for 15 minutes. Turn out onto wire rack and allow to cool completely. Store in fridge or wrap well and freeze.

Monday, August 13, 2012
Traditional Meatloaf

Meatloaf. Comfort food at its best. I just love it! And for something so simple, people sure have lots of different recipes for it! some use just beef, some add veal to the mix. Others cover it in ketchup or BBQ sauce. And other recipes call for diced veggies, like peppers, carrots or even corn and black beans to be added in. Sometime you are directed to use oatmeal and other call for crackers or breadcrumbs. And while all of these recipes are delicious, and trust me, I try every single one I find, This one is the most simple and to us the most delicious. Sometimes just the most basic of things turn out to be the very best.
Be sure to follow the directions to remove the meatloaf from the roasting pan right away or otherwise it will begin to soak up all the greases that were removed during cooking- no one wants greasy meatloaf- yuck! This recipe is taken from Trisha Yearwood's cookbook Georgia Cooking in an Oklahoma Kitchen, but honestly it probably most resembles all of our mom's- before recipes started to get complicated!
My pictures only show one loaf. That is because, well, we just couldn't wait and gobbled up the other one before I could photograph it!

Traditional Meatloaf
2 lbs lean ground beef
20 Saltine crackers
1 large egg, lightly beaten
1 medium onion, finely chopped
1/4 cup ketchup
1 Tablespoon yellow mustard
1 teaspoon salt
1/2 teaspoon pepper
Preheat oven to 350 degrees F.
Gently mix the beef, cracker crumbs, egg, ketchup, mustard, salt, pepper, and onion until blended. Shape the mixture into 2 loaves and place side by side crosswise in a 9x13-inch pan. Bake the loaves for 1 hour, or until they are browned. Transfer to a platter immediately and allow the loaves to cool slightly and firm up before slicing. Garnish if desired with fresh herbs.

recipe from Georgia Cooking in an Oklahoma Kitchen by Trisha Yearwood
Monday, July 23, 2012
Blueberry Quick Bread

This weekend my sister and I gathered the troops and headed up to Vermilion, Ohio to do some blueberry picking at Baumhart Berry Farm. Bonnie had been here once before and raved about it, so this was my first time. What a treasure to find! The aisles are huge, easily accommodating our two large strollers, the bushes are tall enough that you aren't bending over giving yourself a backache and most importantly, the berries are HUGE and sinfully sugar sweet!! I couldn't get over how easy it was to pick them, just grazing your hands over the plump fruits would drop them into your bucket. The kids never tired of the picking and our buckets soon became full. It was a fun afternoon, and even after all our snacking we still came home with more blueberries then one knows what to do with. Don't worry, your tummies will know exactly what to do with them!
Let me help you with this lovely Blueberry Quick Bread. It is overflowing with blueberries in ever single bite. The the bread itself has just the right sweetness and tastes heavenly with some soft butter smeared all over it. Try it with a slice of shaved ham on top. Super yummy!

Blueberry Quick Bread
recipe courtesy allrecipes
5 cups all-purpose flour
1 1/2 cups sugar
2 tablespoons baking powder
1 teaspoon salt
3/4 cup cold butter or margarine
1 1/2 cups chopped walnuts (optional)
4 eggs
2 cups cold milk
2 teaspoons vanilla extract
3 cups fresh or frozen blueberries
Directions
In a large bowl, combine flour, sugar, baking powder and salt. Cut in butter until mixture resembles coarse crumbs. Stir in walnuts.
In a small bowl, beat eggs, milk and vanilla; stir into dry ingredients just until moistened. Gently fold in blueberries.
Pour into two 9-in. x 5-in. x 3-in. loaf pans. Bake at 350 degrees F for 65-75 minutes or until bread tests done. Cool in pan 10 minutes before removing to a wire rack.

This recipe is featured on This and That and http://www.foodiefriendsfriday.com Linky Party
Thursday, July 19, 2012
Toad in a Hole- Midwestern Style

I know that Toad in a Hole means something completely different to people over in Europe where this recipe consists of sausages cooked in Yorkshire Pudding. But to most of us here in the Midwestern United States, Toad in a Hole is an egg that has been sautéed inside a slice of bread where a hole was removed from the center. It is a simple dish, giving you that perfect dunking bread already there and waiting to be slathered in the runny yoke the moment a tine of your fork hits the egg. It takes no time to make and is, well, wonderfully delicious. Plus kids and adults always seem to get a kick out of it!
Toad in a Hole- Midwestern Style
2 slices bread per person
2 eggs per person
butter
salt and fresh ground black pepper to taste
fresh chives to garnish
Using a shot glass or a small biscuit cutter, cut a hole in the center of each slice of bread. Butter both sides of bread as you would for a grilled cheese sandwich. Be sure to butter the circles you just removed from the breads, they are great dippers for the runny eggs!
Place the bread into a nonstick pan and "grill" at medium low heat until just golden. Flip bread and very carefully break the egg into the hole. The yoke should fill it nicely. Season each egg with salt and fresh ground pepper to taste. Allow to cook until you get the eggs to your preferred doneness. I like to lightly cover my pan with foil to set the yoke just a bit more. If you don't like a runny egg at all, just leave the foil on the pan to your perfection. Carefully remove the Egg's in a Hole to each person's plate, garnish and enjoy! Serve along side some fresh fruit and crispy bacon.
